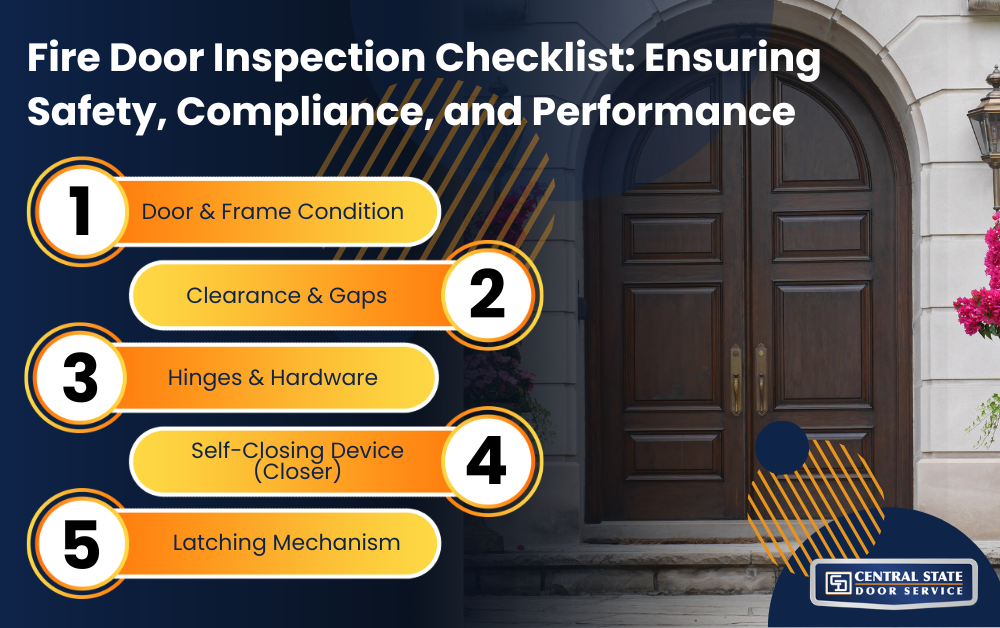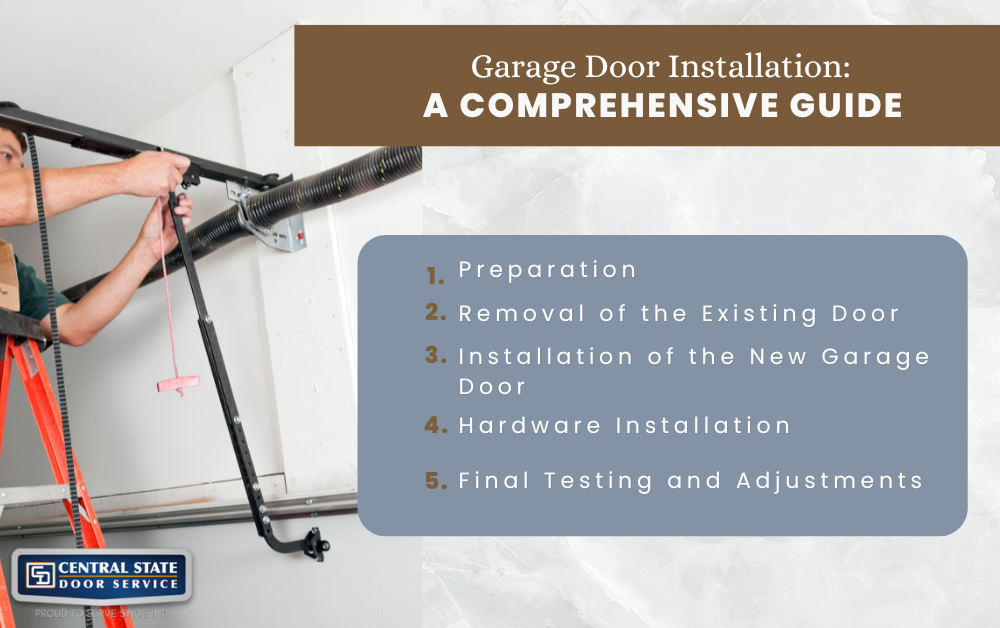
Garage door installation is a substantial remodeling project that can enhance your property’s functionality and curb appeal. At CS Doors we are committed to help you understand the process and make the installation smoother and more efficient. This blog will navigate you through the must-know steps with ease of garage door installation, from preparation to testing and adjustments. Each step ensures that your new door operates safely and effectively. Whether you’re a seasoned DIYer or a first-time installer, this guide will provide valuable insights to help you succeed.
Preparation
Before diving into the garage door installation process, preparation is crucial. Gather all necessary tools, including a screwdriver, wrenches, a level, and safety equipment like gloves and goggles. It’s also essential to have the new garage door and all its components ready for installation. Clearing the workspace will create a safe and efficient environment for the project. Removing any obstacles not only enhances safety but also facilitates smoother installation, setting the stage for success. Taking the time to prepare adequately will pay off in the long run.
Gather Your Tools
Ensure you have all the necessary tools, including bare hands and safety gear. Organizing everything will help you avoid interruptions during the installation process. Check the manufacturer’s guidelines to confirm any specialized tools you may need. This preparation step is critical in avoiding delays and ensuring a seamless workflow. A well-equipped workspace lets you focus entirely on the installation and minimizes the risk of accidents caused by searching for tools mid-project.
Choose the Right Door
The appropriate garage door for your home is essential to meet functional and aesthetic needs. Consider material, style, and insulation to match your requirements and preferences. Take measurements of your garage opening to ensure a perfect fit. Explore various types of garage doors, such as sectional, roller, or tilt-up, to find one that best suits your lifestyle. Don’t forget to consider your budget, as garage doors can vary significantly in price. Choosing the right door will enhance your home’s value and functionality.
Check Measurements
Detailed measurements are key to securing the right fit in garage door installation. Determine the dimensions of your garage door entryway, taking care to account for any obstructions. It is advisable to measure at multiple points, as the opening may not be perfectly uniform. Recording these measurements will guide your selection and installation process. Double-checking your figures can save you time and hassle later on. Ensuring the right fit will lead to better operation and longevity of the door.
Removal of the Existing Door
The next step involves removing the existing garage door. This process requires caution, especially if the heavy door has tension springs. If applicable, start by disconnecting the door from the opener to prevent accidents. Carefully detach the door from the tracks, ensuring you manage the springs safely to avoid injury. Once the door is down, remove all hardware, such as rollers and brackets, to clear the way for the new installation. Properly disposing of the old door will also help you keep the area organized and ready for the new installation.
Disconnect the Opener
If your garage door has an opener, disconnect to ensure a safe working environment. This step is essential for preventing unintended movements while removing the old door. Make sure to follow the manufacturer’s instructions for disconnecting the opener. Once detached, the opener can be set aside for reinstallation later. This preparation step ensures you can focus solely on the door removal process. A clear separation from the opener allows for safer handling of the old door.
Remove the Tracks
After disconnecting the opener, the next step is to remove the tracks that held the old garage door in place. Start by unscrewing the brackets that secure the tracks to the wall and ceiling. Carefully slide the tracks out, ensuring you don’t damage any surrounding structures. Removing the tracks will give you a clean slate for installing the new garage door and hardware. This step is crucial for ensuring that the new installation goes smoothly. Keeping the workspace clear allows for better organization and efficiency.
Dispose of Old Components
Once the old doors and tracks are removed, they must be disposed of responsibly. Check local regulations for recycling options or disposal guidelines. Proper disposal helps keep your workspace tidy and prevents clutter from building up. Additionally, recycling old materials can contribute to environmental sustainability. Make sure to collect all hardware and components associated with the old door. A clean area will improve safety and prepare you for the new installation.
Installation of the New Garage Door
With the old door removed, it’s time to install the new garage door. Begin assembling the panels according to the manufacturer’s instructions, ensuring all pieces fit together correctly. This may involve securing brackets and hinges, so take your time to ensure proper assembly. Once the door is fully assembled, position it onto the tracks, ensuring it is aligned correctly. This step may require assistance, as garage doors can be heavy and unwieldy. A properly installed door is essential for smooth operation and longevity.
Assemble the Panels
Follow the manufacturer’s instructions closely when assembling the door panels. Proper assembly is key to ensuring a secure fit and functionality. Each panel should interlock or connect as designed, providing the structural integrity needed for the door. Double-check your work as you go to avoid mistakes. Having the right tools and a clear workspace will facilitate this assembly process. A well-assembled door will contribute significantly to its overall performance.
Position the Door
Once the panels are assembled, carefully lift the new door onto the tracks. It may be helpful to have someone assist you to ensure it’s aligned correctly and held securely. Taking time during this step is crucial, as a misaligned door can lead to operational issues later. Once positioned, ensure the door is level and securely seated in the tracks. Proper positioning will facilitate smoother operation and prevent future complications. This careful attention to detail will pay off in the long run.
Secure the Tracks
After the door is in place, securely attaching the tracks to the wall and ceiling is essential. Use a level to align the tracks perfectly for optimal door movement. Fastening the tracks correctly is vital to the door’s functionality and safety. This step may require drilling and using appropriate hardware to secure the tracks firmly. Once everything is tightened and secured, double-check your work to ensure nothing is loose. Properly secured tracks will support the door’s weight and ensure smooth operation.
Hardware Installation
Once the new door is in place, it’s time to attach the necessary hardware. This includes installing rollers, handles, and locks, contributing to functionality and security. If your door requires springs, carefully attach them according to the manufacturer’s guidelines. Torsion or extension springs must be installed cautiously, as they can be under significant tension. Double-check that every component is securely in place, contributing to the door’s overall performance and safety. A well-installed hardware setup is essential for the door’s reliable operation.
Install Rollers and Tracks
Begin by installing the rollers in the tracks, ensuring they move freely and smoothly. Properly installing these components ensures that the door operates without any hitches. Take your time to check that each roller is seated correctly on the track. Misalignment at this stage can lead to operational issues later on. Once installed, manually open and close the door to test the movement of the rollers. A smooth operation indicates that the installation is on the right track.
Attach the Springs
Follow safety precautions when attaching the springs, as they are under tension and can pose risks if mishandled. Follow the manufacturer’s guidelines to ensure correct installation and tensioning. If you have doubts, consider contacting a professional to prevent any mishaps. Properly tensioned springs are essential for the door’s smooth operation and longevity. Take time with this step; getting it right is crucial for safety. A correctly installed spring mechanism will enhance the door’s performance.
Add Finishing Touches
Finally, install handles, locks, and any additional hardware needed for your garage door. Double-check that everything is secure and functions correctly before proceeding to testing. These finishing touches enhance the door’s functionality and appearance. Clean any debris from the installation process to leave your garage tidy. A polished look contributes to your home’s overall aesthetic. Taking care of these details will ensure your new door is functional and attractive.
Final Testing and Adjustments
After the installation, it’s essential to test the door’s functionality thoroughly. Open and close the door several times to ensure it operates smoothly without obstructions or irregularities. Pay attention to any unusual sounds, such as grinding or scraping, that might indicate misalignment. Adjust the tracks and springs to achieve optimal performance if you notice any issues. Safety features, such as auto-reverse mechanisms, must be checked to ensure they function correctly. Proper testing and adjustments are vital for the longevity and safety of your new garage door.
Test the Door Functionality
Run the door through several cycles to ensure it opens and closes without issues. Listen for any irregular noises that might indicate a problem and observe how smoothly the door moves. If the door struggles to open or close, note the specific areas needing adjustment. Testing the door’s operation is a critical step that should not be overlooked. A fully functional door ensures peace of mind for your home’s security. Taking the time to test thoroughly will help you catch any issues early.
Make Necessary Adjustments
Adjust the tracks and springs if you notice any operational issues during testing. Fine-tuning these components can enhance the door’s operation and prevent future complications. Use a level to ensure everything is aligned correctly and the springs are properly tensioned. Regular adjustments may be necessary as the door settles into place over time. Taking care of these details ensures your garage door remains in good working condition. A well-adjusted door will provide reliable performance for years to come.
Check Safety Features
Finally, ensure that all safety features are functioning correctly. Test the auto-reverse mechanism and other safety functions to guarantee that the door will stop if an object is detected. These functionalities are essential for safeguarding against accidents and ensuring the safety of both people and pets. Regularly checking these systems can help you avoid potential mishaps in the future. A well-functioning safety system adds an extra layer of protection for your home. Ensuring these features work correctly is crucial for peace of mind.
Conclusion
Garage door installation is a valuable undertaking that boosts your home’s value and functionality. By following the steps outlined in this blog—preparation, removal of the old door, installation of the new door, attaching hardware, and thorough testing—you can ensure a successful installation process. If you’re ready to improve your home with a new garage door.
Don’t hesitate to contact CS Doors today! Your home deserves the best in both safety and aesthetics! Investing in a quality garage door will elevate your property and provide reliable service for years.